

cortina-city
-
Content Count
6,899 -
Joined
-
Last visited
-
Days Won
57
2 Followers


Recent Profile Visitors


-
im hearin ya control, starcraft thread hijack tony may activate the starcraft self destruct sequence. THE SHIP WILL DETONATE IN T MINUS 15 SECONDS
-
Ahaaaa so this is where its all happenin lads!!!!! and whats this??? Health and safety......yes its the HSE executive here. Clipboard n hi vis at the ready boom i just got hit, incoming, it came thru the screen LOL well ok, tony dont wanna us moanin anymore, so, im throwin in the fireproof blanket and trading my root beer for the real thing, i begin drunken welding immediately, all bets are off, drunk i am, drunk as a lord, and ready to weld........LOL I just uncovered this thread as I aint been on BSC for a bit its like lifting a cardboard box in the boot of a cortina and finding a mice nest look at em all scatter!!!! there goes disco, there goes RT!!!! there goes tony and tibbsy!!!! look at em run...... theres another 3 of em !!! , blind blind as bats, 3 of em.....should have wore goggles its discos fault, he has encoraged drunken shen anigans!!!!! angels one five, stella, over p popsy Ken are you recieving, can you hear me dave scotland calling.............crackle.... Serious, WOW Mr T i watch you on you tube, no more advisories from me, i shall refrain from HSE advice !!! ...........but glad to see goggles were on when inside for that least session !! (so you tell us, as i see no on screen proof) GREAT RESTO more screen time with disco please. Pete
-
WOW this has come along very nicely Brian!!!! incredible work, what a lovely shell
-

Has anyone ever opened a mk3 servo?
cortina-city replied to brian grech's topic in Engine & Transmission
im still posting vids on youtube, may do a build thread on here on bramble, but im spending most my time on my own forums now. i have set up a patreon site which helps. ill pop in every now and again on here. pete -
Has anyone ever opened a mk3 servo?
cortina-city replied to brian grech's topic in Engine & Transmission
failure on these is quite rare. good results can be achieved by carefully blasting, filling and priming sanding then paint never known one fail but have known them go weak i had mine on Ruby stripped and rebuilt i didnt want to attempt seperating it. that spring inside is tricky it aint worth it without special tools if you want a really good servo have it professionally rebuilt. for brakes i left the servo and master cylinder to a specialist brakes company , http://www.jlspares.com/ these guys are the masters (excuse the pun) then you know it will be right. brakes are too important. for all the time and effort and money you done on that incredible rebuild i would send it to them. (if you feel its faulty) i suppose you could do a leak test on it, if it dont leak its prob ok. why not telephone them and ask for info. they told me it was best to rebuild as the rubber / spring and other parts work better if replaced (i guess they biased though!) I MUST SAY RUBYS BRAKES ARE VERY SHARP FOR JUST STANDARD BRAKES so for me it was worth it. i can tell the difference on the pedal compared to older servos i have heres what they did: stripped and replaced all internal servo components shot blasted and primed the casing resleeved the master cylinder with stainless and fitted new seals. for my calipers i chose 'big red' i then used mintex pads with copperslip on the squal shims stainless pad rods and fitting kit perfect for rears just standard setup with new rear cylinders and mintex shoes i think the brake rebuild is covered in my online videos good luck brian and superb looking resto, love the primer on the panels -
as craig says Brina, you press this in to see if there is any adjustment needed on shoes, normally the self adjusting ratched cog and sprag will take up adjustment but as safe guard you can press the plastic plunger in to see how far the travel is, they can be bought on ebay from time to time
-
all available new Ken from BRESCO.com
-
ooooh those flush welded in panel repairs with the derriere clamps really just pop it for me, just love it when you flush fit a patch then gently flap wheel back leaving invisible repair, its like taking back control of time.
-
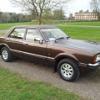
What have you done to your Cortina lately?
cortina-city replied to nascar66's topic in Ford Cortina Discussion
Richard dont know if tis will help but burtons do do a stat housing. also check condition of stat rubber seal, ive seen a few deform whilst in use and allow water to go straight thru/under the rubber, comprimising the closing action of the stat resulting in engine running cool -
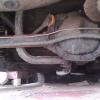
The common route on early cars was fule line plastic pipe goes along the offside chassis rail using combination of clips, 8mm pipe clips, a metal tank (nearer fuel tank) and black plastic slide on clips, again near tank attached to chassis fork, then runs up to front on 8mm clips until it reaches bottom of front lower inner wing chassis rail, from here a rubber fiuel pipe section (usually cloth braided rubber) is used to flexi connect it to a stell 8mm pipe which bends in order for it to weave under the front inner wing exiting (as you say) just near top of subframe mount. from here a short piece of flexi tube is used again, this time to connect to a further shaped piece of 8mm steel tube which attaches to front lower inner crossmember panel using again 8mm pipe clips, it then finishes just below area where the fuel pump is on the 2.0 engine, it then connects to a inline fule filter using flexi hose until finally it connect to carbs. Its wise to secure the inlet brass insert to the carb (if yours is push in type) as they can fall out throwing fuel all over the engine bay. This has been the cause of fires in the past. Whilst flash point of petrol is not low enough on a hot exhaust there still hi chance of fire if a spark occurs. It seems later cars routed the pipe along an extra metal tang asjacent the brake line, running across the front suspension subframe. on later cars a second return fuel line was added, the reason for this im dont know. In a frontal collison i would have thought fuel line safer on the clip than on front valence inner. All my cars have the fuel line up front. detailed pics on my videos and build pics of PROJECT RUBY Pete
-
so far its quite solid
-
the last 3 vids are all strip down vids, in part 3 its a coin hunt with magic mushrooms, mushrooms growing in the car, dried out and when you vac, you errr trip more than a fuse
-
thanks guys
-
-
Cool Black & White MK3 GT Garage Picture
cortina-city replied to TIB3300's topic in Ford Cortina Discussion
interesting heater matrix water pipe routing

